Riven (2024) | Complete Walkthrough – Part 2
Welcome to Part 2 of our Riven walkthrough for 2024. In case you didn’t realise, this is a fully remade version of the classic sequel to Myst, and as such, the puzzles and solutions are completely different. In Part 2 of our Riven walkthrough 2024, we continue your journey through the entire game, so you never get stuck, lost, or frustrated with a puzzle in the remake.
Riven (2024) | Complete Walkthrough
Part 2 – Jungle Island
Contents:
a. The Moiety Lens
There’s only one way to go currently, and that’s up some steps into a caved area. Almost immediately we will pass a little water area on our right. We will come back to this shortly once we know more about this land, as it will be easier to piece information together. Continue on the path, and you will come to a junction. Head left, to take the stairs downwards towards the bay. The animals sunning themselves on a rock will leave as you move close. Turn to your left, and follow the beach around, hugging the rock. Hanging on a rock, glinting in the sun is the Moiety Lens – pick it up to add it to your inventory.
With the lens held up, you will see some hidden white substance not visible to the naked eye. The Moiety are the natives of Riven, and they use this substance to hide messages and clues from Gehn and his men. You can use the X button (on an Xbox controller) to pull the Lens out at any time to inspect your surroundings.
b. Learning numbers in different languages
Now head back to where you entered the bay, and this time head straight ahead to find a new set of stairs up, behind some trees. You will come across another totem – there was one in that water area we passed when we arrived on the island too. These are important but we need to learn all about numbers before we can start piecing together some of the clues as we find them. For now, head to the right of the totem, following the walkway, into the Moiety village.
The path to your left is blocked, so take the path right, and then down towards the water level. There is a building here you can enter. You’ll quickly realise it is a school run by Gehn to try and teach the local Moiety people of the D’ni numbering system and more, and that’s fitting as we are here to learn it too.
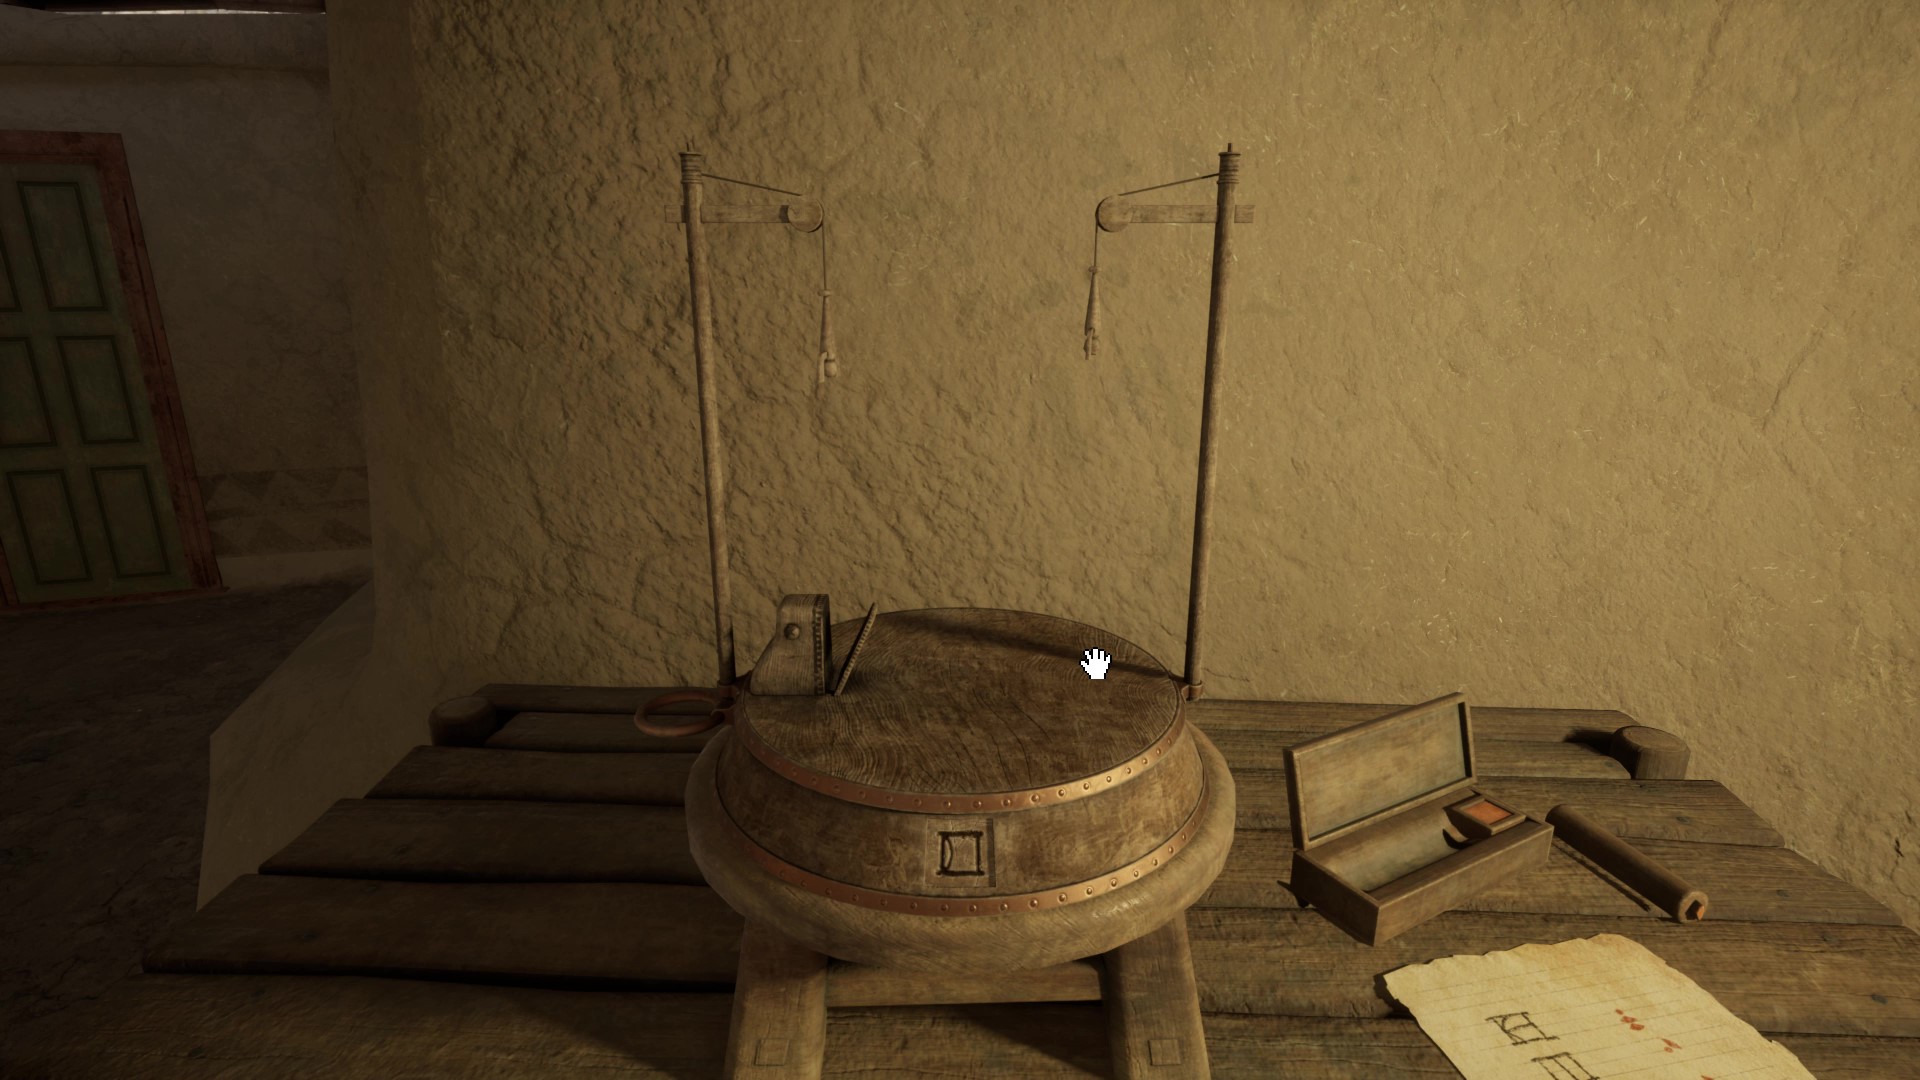
There’s a lot to look at here, but your main area of focus should be the table to your left as you enter. On here is a game to help the Moiety read D’ni numbers. Each interaction with the game, spins a number wheel at the bottom, and then lowers a wooden figure that number of notches closer to the fish’s mouth. So by playing this game over and over, you can discover various D’ni numbers and how they are written.
Take some time to do so yourself, before reading on, as it removes some of the discovery.
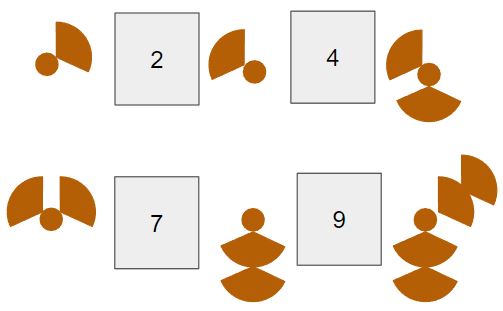
What you will find with some deduction is the numbers 1 to 5, are written as follows, left to right:

And the numbers 6 to 10 are as follows, from left to right:

The key here is to notice patterns, particularly around multiples of five. You will notice that the number 5 is just the number 1 but flipped counter-clockwise 90 degrees. The same is true of the number 10 being number 2 flipped counter-clockwise 90 degrees. It may be clearer to see below, by putting them together:


And then, all you need to do to write the other numbers is consider them as the highest multiple of 5 plus a remainder. So for example:
8 = 5+3 in terms of design
11 = 10+1 in terms of design
17 = 15+2 in terms of design
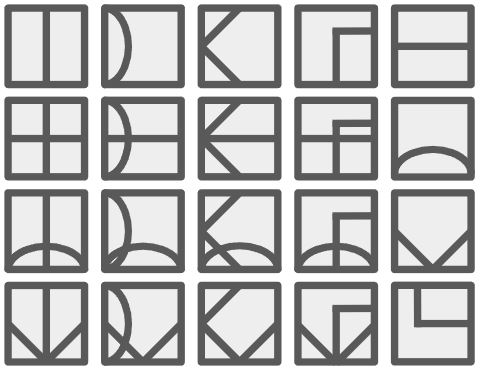
Using the rotation assumption for each 5 numbers, and then making the rest of the numbers up by adding the appropriate 1-4 number onto each design, this gives us the following D’ni numbers from 1-20. Note these down for reference throughout the game:
But we’re not done yet! We now also need to understand the Moiety number system, and we can figure that out here too. Look to the right of the game to see a piece of paper, clearly written by a Moiety student, trying to learn D’ni numbers. On it, they have written the following:
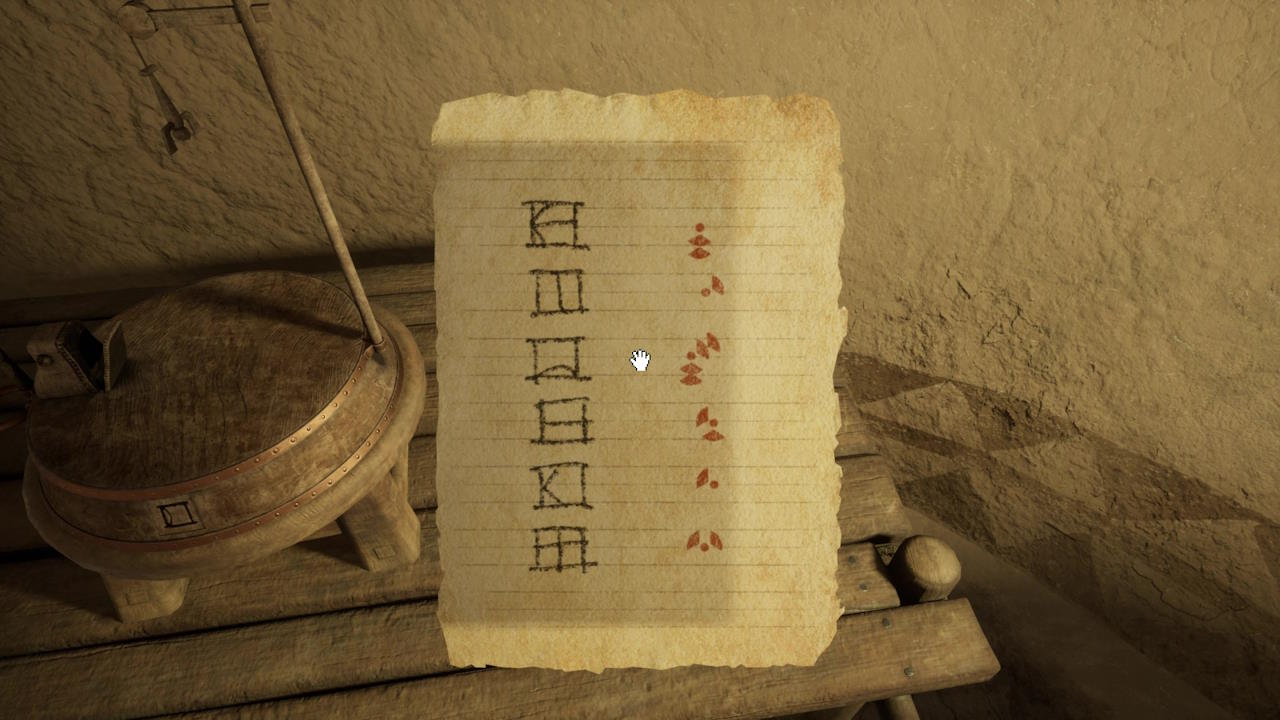
We know from our reference material that this tells us what Moiety numbers for 8, 1, 10, 5, 3, and 6 are. And if we put them in the same groups of five, it means we know these numbers, with some gaps:
Take some time to look for patterns here yourself before reading on for the solution.
So now we just need to look for patterns to figure out the gaps. it’s clear the Moiety number system uses a central circle and then one or more of three directions outwards from the circle. It also seems that as the numbers increase so too do the segments used. In numbers 1 and 3, there is only one segment used, so 2 will only use one segment, which would be downwards from the dot. It becomes clear at this point that numbers change their structure every 3 numbers. So 1-3 are similar, as are 4-6, and then 7-9. Using this understanding , and the patterns we can easily fill in the gaps, so the numbers for 1 to 10 in Moiety are:
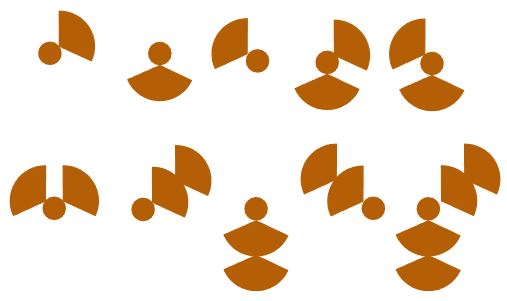
Again note these down, as we will be using them.
c. The Totem Secrets
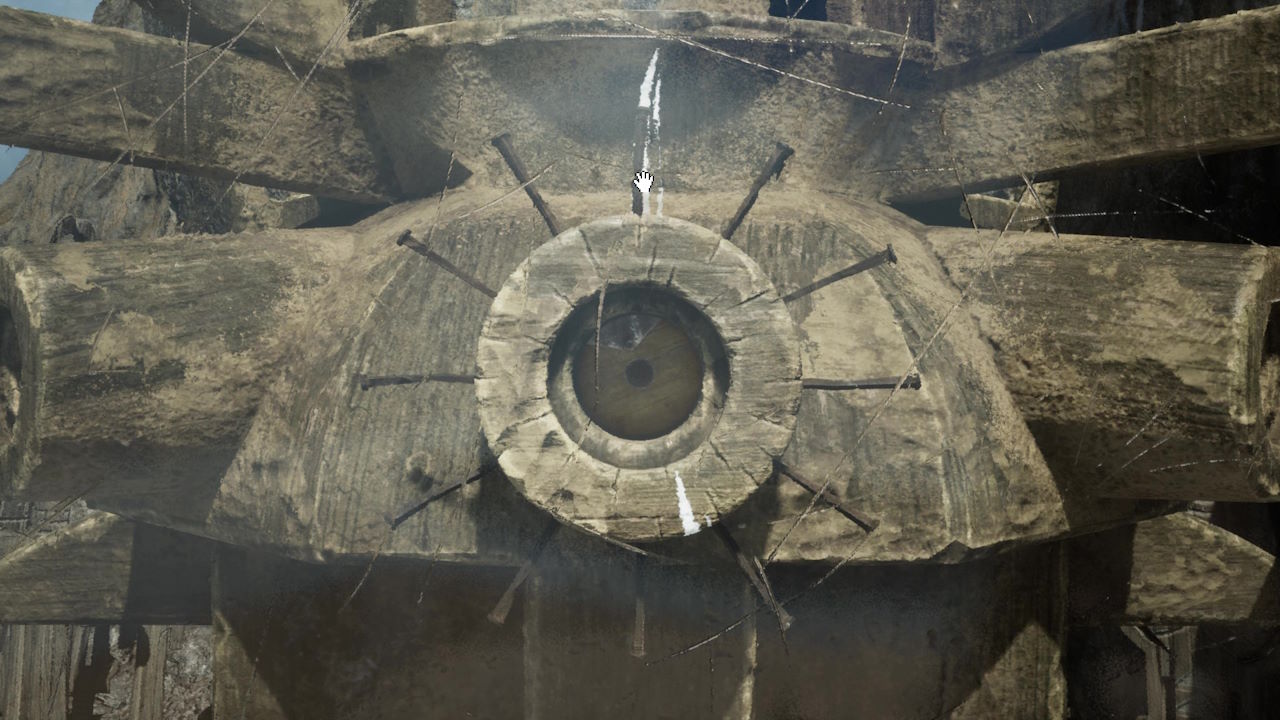
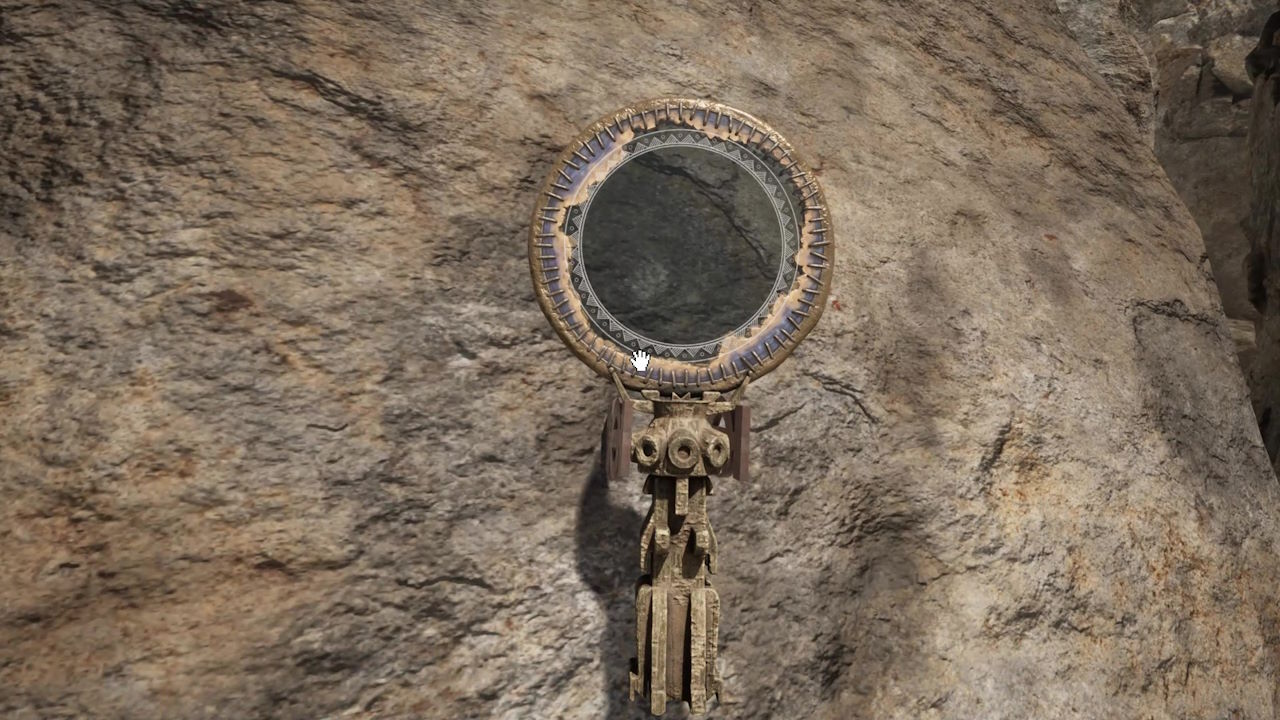
Now armed with a lot of knowledge, we can go and explore Jungle Island properly and piece together information for each totem. Exit the school and head back to the totem up the top of the hill. Equip your Moiety Lens and look at the Totem. There will be an eye with nails around it, but crucially some hidden white paint only visible on it too. Rotate the lens by interacting with the nails – and then using the right stick on an Xbox controller – to line up the white lines.
Now inspect the shape in the Totem eye, and you will see a Moiety number, you have just learned. Here you will see the Moiety number for 2. So note that down. Now normally, around each totem, you can also use your Lens to see a hidden animal symbol. If you stare left towards the tree over the rope bridge there are some hidden white blooms, but right now, the tree is not in full bloom so we cannot see the animal shape. We will need to come back here later once we have.
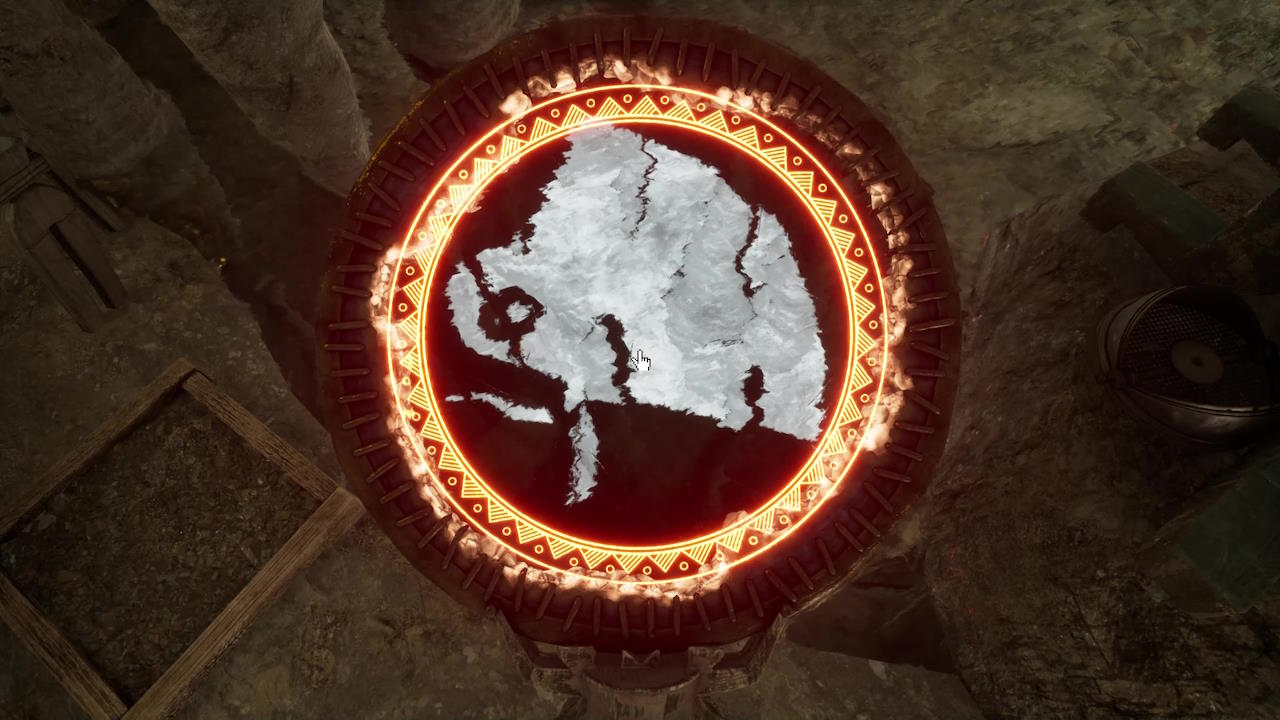
Now let’s head back to the Water area at the start of Jungle Island. Here you will see another Totem. Again use your Moiety Lens on the Totem eye and rotate it so that the lines match up. For this totem, you will notice the number 6 in the eye. Now let’s find the corresponding animal image. Looking around with the lens will reveal a lot of white substance on the rocks above the water. But that’s not what we want. There is a small water tap you can interact with to pour water into the pool. Do so, and then angle your lens into the water to spy the substance’s reflection in the water. You’ll know when you have it as the Moiety lens will turn red. Feel free to roughly draw it in your notes, or take a picture (with RB on an Xbox controller) to permanently store it in the menu, just remember, its associated number is 6.
Now leave this area, back away from the Mag-Lev, but this time head right and up the steps. You will come across a bridge, cross it, and you’ll be in an open area.
At the fork in the path, take the right path, and then a little way, before you get to a door, there are some steps down from the path to the right. These lead to yet another Totem for you to investigate. Do the same as before with lens and match up the white lines. This will reveal the Moeity number for 5.
From the totem, look to the left, and you will see a lot of the moths turn white under the Lens revealing your animal shape. You may need to take a couple of pictures, as the animal is a bit too large to capture in one lens, but it is a frog-type animal with a large tongue:
Again draw it, or take a photo to access later.
Now head back to the path, and turn right, and you will come to a door. Simply interact with it to push it open. Follow the path down and go through an arch in a tree. After coming out the other side, immediately turn left, down a path dotted with blue mushrooms. Then keep following it when it heads back up on a wooden path. You’ll come to a new Totem. Now annoyingly, the eyepiece denoting its number has been removed. We will have to find it later. We can find the animal though using our lens. Look to the left through the green leaves. Find the right orientation to discover this bird animal, and take or draw a picture for later:
d: Noteable areas for later, then leave
There’s nothing else we can physically do in Jungle Island for now, so we need to leave. But before we do, we’ll just highlight a couple of areas that we will come back to later.
From where you are, head back through the mushroom cave to the main path, and head left. At the junction, head right, and and down the path to see a big menacing totem that we cannot open yet, along with some high walkways we cannot reach – you may have already seen the brown spinning dome of this island too. We will come back to this later.
Now head back up the path, and turn right at the junction, to take the only remaining path. Open the door ahead of you, and at the junction head right (Left actually takes us back to the open area with Totem number 5.) Head into the cave and down, and you will come to some wooden walkways over the water. This is actually the other side of the Moiety village we found earlier, although like on the other side, our progress is also blocked from this side. We shall return here later.
For now, head all the way back to Totem number 5. From the totem, turn around, and you will see a small slope with a minecart. Approach the minecart from the left to get on the back of it. Then interact with the lever on the left to ride it to Boiler Island.